AVADirect Clear CMOS (Reset BIOS) Guide
There is a CMOS memory onboard that is powered externally from a battery located on the motherboard to save system configuration data. If you want to clear the system configuration, set the jumper to clear the CMOS memory.
There are a couple methods on resetting the CMOS. Most motherboards have the traditional “Jumper”. As technology improves, the CMOS reset process has evolved into built-in buttons and removing the jumper in total. Methods on clearing the CMOS will be described in the cases below.
– Resetting BIOS to default values (Clear CMOS) “Jumper”
1. Power off the computer and unplug the power cord.
2. Use a jumper cap (a small screw driver will do) to short the CMOS pins
3. Hold the jumper cap (screwdriver) in place for about 5-10 seconds
4. Remove the jumper cap (screwdriver) from the jumper pins
5. Plug the power cord in and try powering on the computer as you normally would
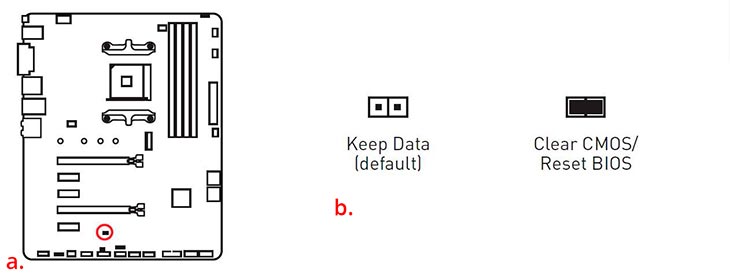
a. Most jumper pins can be located near the CMOS battery. Or in the vicinity of the highlighted area on the motherboard above.
b. Illustration of a 2-pin CMOS header.
c. Illustration of a 3-pin CMOS header and what it should look like when the corresponding pins are jumped
Note: Most motherboards already have a jumper on pins 1 & 2 and require that jumper to move to pins 2 & 3 in order to be successfully jumped.
d. Picture of motherboard jumpers.


– Resetting the BIOS to default values (Clear CMOS) “Battery”
1. Power off the computer and unplug the power cord.
2. Locate the CMOS Battery
3. Use a small flat headed screw driver to push the pin holding the battery in place, then lift the battery out of the socket.
4. Leave the battery out of the socket for 5-10 seconds.
5. Place the battery back into the socket
6. Plug in and power on your computer as you would normally
– Resetting the BIOS to default values (Clear CMOS) “BIOS button”
1. Power off the computer and unplug the power cord.
2. Locate the “CMOS” button on the back of the board near the I/O ports
3. Press and hold the “CMOS” button for 5-10 seconds
4. Plug in the power and power on the computer as you would normally


No comments yet