
August 23, 2022
|Gerard Walenciej2022-08-23T13:00:002023-05-30T16:28:26How to test basic PSU functionality in a custom computer (Jumper/Paperclip Test)
Category:
Is my power supply broken?
One of the most common points of failure in a PC is the power supply (PSU). The reason for this is that all the power that is put into the PC flows through the power supply like a hub and is then distributed among all the various components in your PC. Because of this, the PSU is the most strained component in any system, and as a result they are more prone to failure than any other PC component. PSU failures can come in many forms, ranging from simple disruptions such as display cuts, all the way up to no signs of life in the PC (not powering on, no visible LED’s on, no fans spinning). The troubleshooting technique we will be showing today applies more to the latter.What is the jumper test, and how do I test my PSU?
The Jumper test, or paperclip test as it’s commonly known is, as the name implies, a jumping of the PSU to get it to kick on by itself. This test can be used to determine if the PSU is at least somewhat functional. By shorting two pins on the 24 pin connector, you can get the PSU fan to spin up and (if connected to the PSU) get case fans and LED’s to turn on as well, indicating functionality. In order to perform this test, please follow the steps below.- Check your AVA accessory box for a manufacturer’s official jumper tool. Some manufacturers such as EVGA include a jumper you can use to perform this test. Not all models will come with this jumper, but if yours does then it would be included in the accessory box. If you do have it, please skip to step 3. **NOTE** Not all jumpers will have a wire sticking out of the top as depicted in the image below.
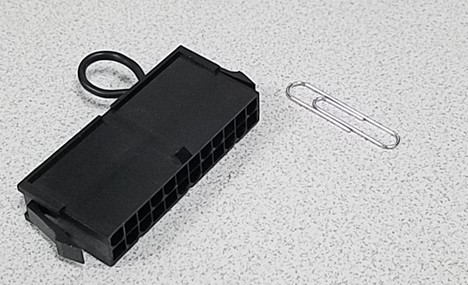
- If you do not have the jumper tool. Please find a standard size paperclip and unfold it into a long piece. A piece of wire the same thickness will work as well.
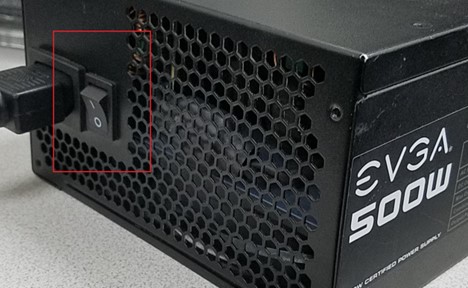
- Power the PC off and ensure the main power switch on the back of the PSU is flipped to the off position (O).
- Disconnect the 24 pin connector from your motherboard. This connector is typically found on the right-hand side of the motherboard, closer to the top.

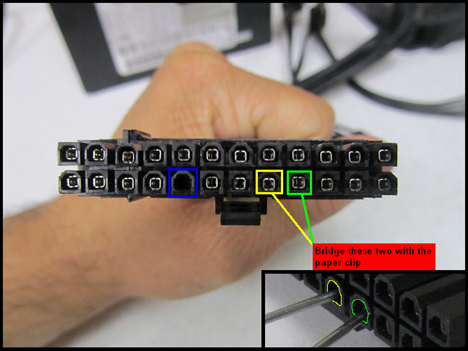
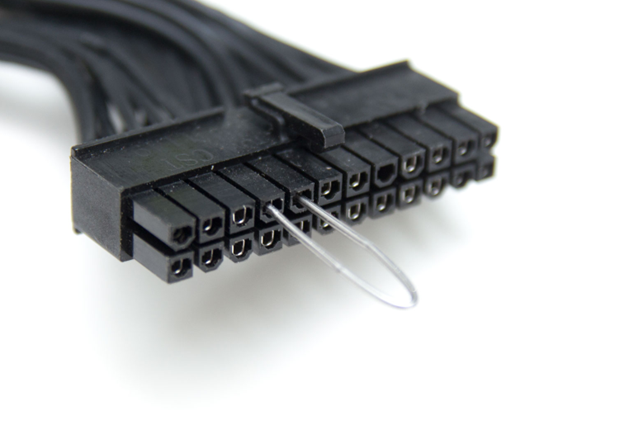
- Connect the jumper tool to the end of the cable. If you do not have the jumper tool, take the unbent paperclip from step 2 and bend it so that you can insert it into the designated pins depicted in the images below. No matter what brand or model of PSU you have, the pins used should be the same.
- Once the jumper tool or the paperclip are connected, you can flip the switch on the back of the PSU to the on position (I). As soon as you do this, the PSU fan and any LED’s and fans connected directly to the PSU should also kick on. If none of these kick on, then that means the PSU is at fault. If one or more do kick on, it is still possible that the PSU is bad, however there is a possibility that another component could have failed.

Latest News

June 22, 2026
|Jacob Goodheart2026-06-22T05:54:062026-06-22T05:54:24Why Compact Gaming PC’s Deserve a Spot in Your Home
Custom Gaming PC’s are one of the many types of systems we build that have a wide range of customization options, especially when it comes
Read post
May 20, 2026
|Jacob Goodheart2026-05-20T09:20:002026-05-25T07:55:05Meet Haze – Console Gaming with a PC Punch
I have been a console gamer all my life. The first system I ever owned was a Sony PlayStation when I was about four years
Read post